
In this age of computers there is no such activity that cannot be achieved without computers. computers has become an indispensable ad multipurpose tool. It has become the need of people just like telephone , television ,mobile phone, or electronic device.
CONCEPT OF COMPUTERS SYSTEM
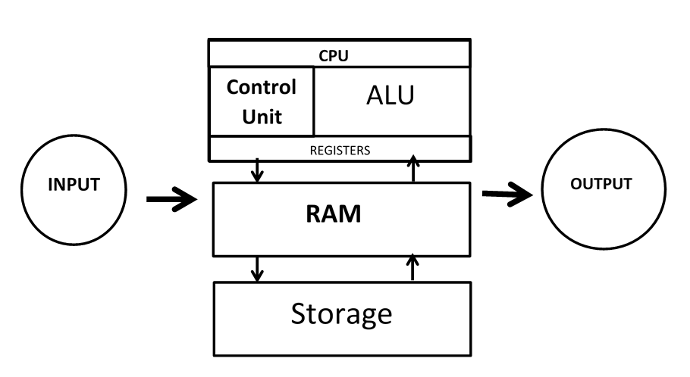
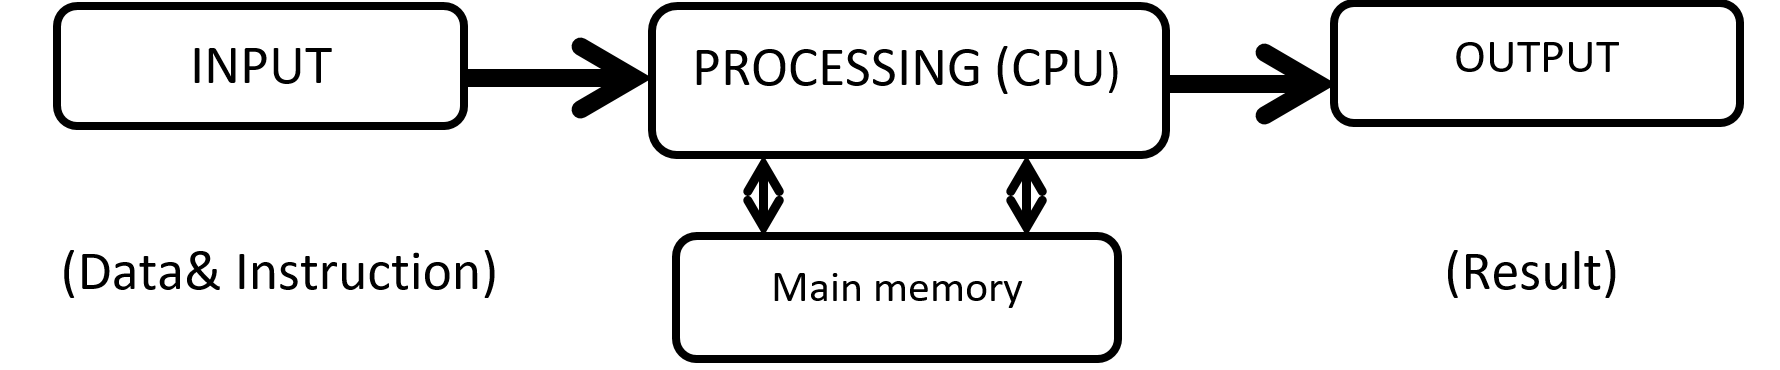
A computer is an electronic device or machine. that takes in data & instruction (input) , works with the data (processing) & brings out information (output).
FULL FORM OF COMPUTER.
C=Common
O=Operating
M=Machine
P=Particularly
U=Used For
T=Technology
E=Education &
R=Research

To know about the working of computer , first need to understand various term such as Data, Processing & Information .first of all ,lets start with three basis terms:-
1. Data :Data is the collection of raw facts and figures without any sequence .When the data is collected as facts and figures, there is no meaning to it ,at that time .
For example :- name of people , names of employees, etc.
2. PROCESSING :Processing is the set of instruction given by the users to the related data that was collected earlier to output meaningful information. The computers does the required processing by making the necessary calculation , comparisons and decisions.
3. INSTRUCTIONS :Instruction are the directives or commands given to the computer according to which it operates the data.
4. INFORMATION:Information is a processed data. It means what we get after processing data (meaningful data) .Data are aggregated and summarized in various meaningful ways to form information.
NOTE:- You should understand that what goes in computers is Data and what comes out of them is Information . This process of turning data into information is also known as Information Processing Cycle.
A COMPUTER IS MADE UP OF THREE MAIN
DEVICE:-
1. Input devices which are used to feed data and instruction to the system.
2. Processing device or Central Processing Unit which process the data according to the instructions.
3. Output
devices which gives out the result of processing to the user.
INPUT DEVICE:-
The computer parts or device which are used to give data and instruction into the computer system are called input devices.
Some Input Device are :-
Keyboard , Mouse , Digital Camera , Drawing Tablet , Microphone , Scanner , Joystick , Touch Screen , Barcode Scanner , Magnetic Ink Character Recognition System (MICR) , Magnetic Strips , Smart Card , Optical Mark Reading (OMR) , Light Pen .
OUTPUT DEVICE:-
Output device are device that we used to get information out of a computer.
Some Output Device are :-Monitor , Printer , Dot Matrix Printer , Inkjet Printer , Laser Printer , Speaker , Plotter , Headphone .
CHARACTERSTICS OF COMPUTER:-
The major characteristics of computers are the following:
1. Speed: A Powerful computer is capable of executing about 3 million calculations per second.
2. Accuracy: Computers can perform all the calculation and comparisons accurately provided the hardware does not malfunction.
3. Reliability: Computers are immune to tiredness and boredom or fatigue. Thus they are more reliable than human beings.
4. Memory/Storage Capacity: We store the data in these types of devices.
5. Versatility: Computers perform repetitive jobs efficiently. They can solve labour problem or hazardous jobs in hostile environment. They even can work in the areas where human brain can error for instance observing motion of very fast moving articles. Also they can work with different types of data and information like graphic ,audio, visual, characters etc.
6. Automation: Once the instructions are fed into computer it works automatically without any human Diligence: A computer will never fail to perform its task due to distraction or laziness.
7. Flexibility: Computers can be used for entertainment, for business, by people who hold different ideals or who have varied goals. Almost anyone can use a computer, and computers can be used to assist with almost any goal.
GOALS OF COMPUTER:-
1. Problem-solving techniques using the computer.
2. Analysis of complex problems and the synthesis of solutions. 3. Comprehension of modern software engineering principles.
3. A vast breadth and depth of knowledge in the discipline of computer science.
COMPUTER CAPABILITIES:-
Like all machines, a computer needs to be directed and controlled in order to perform a task successfully. Until such time as a program is prepared and stored in the computer's memory, the computer 'knows' absolutely nothing, not even how to accept or reject data. Even the most sophisticated computer, no matter how capable it is, must be told what to do. Until the capabilities and the limitations of a computer are recognized, its usefulness cannot be thoroughly understood.
In the first place, it should be recognized that computers are capable of doing repetitive operations. A computer can perform similar operations thousands of times, without becoming bored, tired, or even careless.
Secondly, computers can process information at extremely rapid rates. For example, modern computers can solve certain classes of arithmetic problems millions of times faster than a skilled mathematician. Speeds for performing decision-making operations are comparable to those for arithmetic operations but input-output operations, however, involve mechanical motion and hence require more time. On a typical computer system, cards are read at an average speed of 1000 cards per minute and as many as 1000 lines can be printed at the same rate.
Thirdly, computers may be programmed to calculate answers to whatever level of accuracy is specified by the programmer. In spite of newspaper headlines such as 'Computer Fails', these machines are very accurate and reliable especially when the number of operations they can perform every second is considered. Because they are man-made machines, they sometimes malfunction or break down and have to be repaired. However, in most instances when the computer fails, it is due to human error and is not the fault of the computer at all.
In the fourth place, general-purpose computers can be programmed to solve various types of problems because of their flexibility. One of the most important reasons why computers are so widely use today is that almost every big problem can be solved by solving a number of little problems-one after another.
Finally, a computer, unlike a human being, has no intuition. A person may suddenly find the answer to a problem without working out too many of the details, but a computer can only proceed as it has been programmed to.
HISTORY OF THE DEVELOPMENT OF COMPUTERS:-

In beginning, there were no computers. To add or subtract, man used his fingers and toes. Abacus is known to be the first mechanical calculating device. The main purpose of abacus was that additions and subtraction could be performed quickly. Abacus was developed by the Egyptians in the 10th century B.C, but the final structure was given in the 12th century A.D. by the Chinese educationists. Abacus is made up of a frame in which rods are fitted across with rounds beads sliding on the rod.

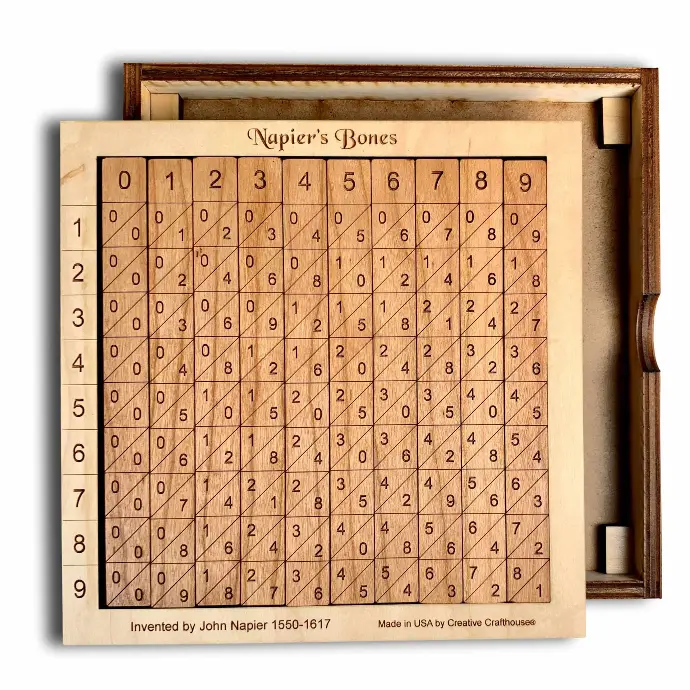
NAPIER BONES
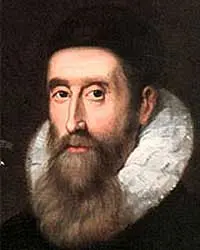
Born: 1550 in Merchiston Tower in Edinburgh, Scotland
Napier's Bones in an Abacus invented by John Napier Napier's used the
bone rods for counting purpose where numbers were printed on them. With the
help of these rods, one could do addition, subtraction, multiplication and
division speedly.
NAPIER'S CALCULATOR
Napier's bones is a manually-operated calculating device created by John Napier of Merchiston, Scotland for the calculation of products and quotients of numbers. The method was based on lattice multiplication, and also called rabdology, a word invented by Napier. Napier published his version in 1617.
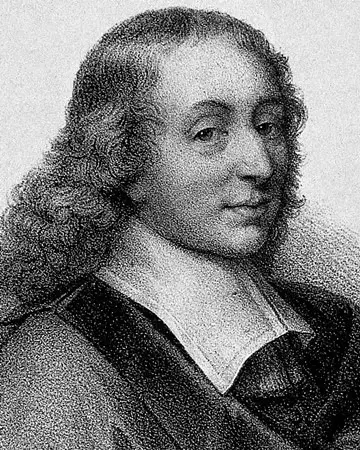
BLAISE PASCAL
| 19 June 1623 Clermont-Ferrand, Auvergne, France In the year 1642, Blaise Pascal a French scientist invented an adding machine called Pascal's calculator, which represents the position of digit with the help of gears in it. Though these machines were early forerunners to computer engineering, the calculator failed to be a great commercial success. |
PASCAL'S CALCULATOR
Blaise Pascal's 17th-century calculator, the Pascaline, was the first widely used mechanical calculator. While limited to addition and subtraction (multiplication done through repeated addition), it was a marvel.
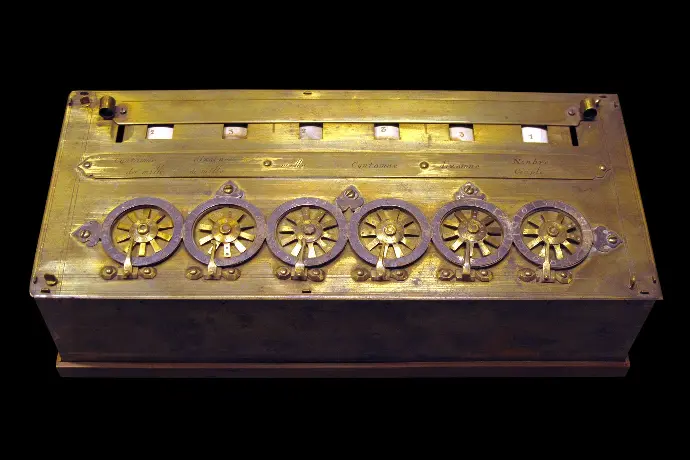
Geared wheels displayed results, and a clever carry system ensured accuracy. This groundbreaking machine, a testament to human innovation, paved the way for future computers.
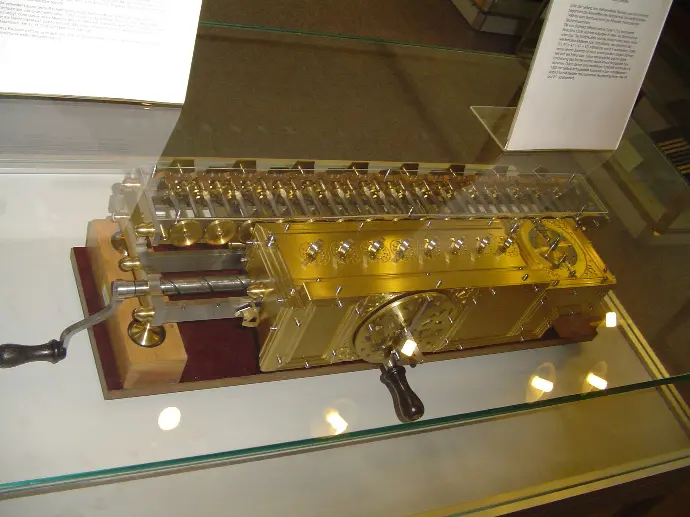
LEIBNIZ CALCULATOR
| The stepped reckoner or Leibniz calculator was a mechanical calculator invented by the German mathematician Gottfried Wilhelm Leibniz around 16 and completed in 1694. The name comes from the translation of the German term for its operating mechanism, Staffelwalze, meaning "stepped drum". |
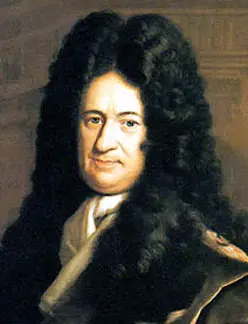
GOTTFRIED WILHELM LEIBNIZ
Gottfried Wilhelm Leibniz was a German polymath active as a mathematician, philosopher, scientist and diplomat who invented calculus in addition to many other branches of mathematics and statistics.
Leibniz was successfully introduced as a calculator onto the market in the year 1646. It was designed further in 1673 but it took until 1694 to complete. The calculator could perform the basic mathematical operations such as add, subtract, multiply, and divide. Wheels were placed at right angles which could be displaced by a special stepping mechanism.
There are five generations of computer are follows:-
FIRST GENERATION OF COMPUTER

The beginning of commercial computer age is from UNIVAC (Universal Automatic Computer).
The first generation computers were used during 1942-1955. They were based on vacuum tubes. Examples of first generation computers are ENIVAC and UNIVAC-1.
ADVANTAGES OF COMPUTER:-
- Vacuum tubes were the only electronic component available during those days.
- Used magnetic drums which provide very less data storage.
- Vacuum tube technology made possible to make electronic digital computers.
- These computers could calculate data in millisecond.
DISADVANTAGES OF COMPUTER:-
- The computers were very large in size.
- They consumed a large amount of energy.
- Non-portable.
- Limited commercial use.
- Very slow speed.
- Used machine language only.
- Used magnetic drums which provide very less data storage.

The second generation computers used transistors. The size of the computers was decreased by replacing vacuum tubes with transistors. The examples of second generation computers are IBM 1400 series and CDC 164 etc.
ADVANTAGES OF COMPUTER:-
- Smaller in size as compared to the first generation computers .
- Used less energy and were not heated. Better speed and could calculate data in microseconds.
- Used faster peripherals like tape drives, magnetic disks, printer etc.
- Used Assembly language instead of Machine language.
DISADVANTAGES OF COMPUTER:-
- Cooling system was required.
- Constant maintenance was required.
- Only used for specific purposes.
- Costly and not versatile.
Third
Generation Computers (1964-1975)

The Third generation computers used the integrated circuits (IC). The first IC was invented and used in 1961. The size of an IC is about 4 square inch. A single IC chip may contain thousands of transistors. The computer became smaller in size, faster, more reliable and less expensive. The examples of third generation computers are IBM 370, IBM System/360, UNIVAC 1108 and UNIVAC AC 9000 etc.
An integrated circuit (IC), sometimes called a chip or microchip, is a semiconductor wafer on which thousands or millions of tiny resistors, capacitors, and transistors are fabricated.
ADVANTAGES OF COMPUTER:-
- Smaller in size as compared to previous generations.
- More reliable.
- Used less energy.
- Better speed and could calculate data in nanoseconds.
DISADVANTAGES OF COMPUTER:-
- Air conditioning was required.
- Highly sophisticated technology required for the manufacturing of IC chips.

The fourth generation computers started with the invention of Microprocessor. The Microprocessor contains thousands of ICs. The LSI (Large Scale Integration) circuit and VLSI (Very Large Scale Integration) circuit was designed. It greatly reduced the size of computer. The size of modern Microprocessors is usually one square inch. It can contain millions of electronic circuits. The examples of fourth generation computers are Apple Macintosh & IBM PC.
ADVANTAGES OF COMPUTER:-
- More powerful and reliable than previous generations.
- Small in size.
- Fast processing power with less power consumption.
- Fan for heat discharging and thus to keep cold.
- Cheapest among all generations.
- All types of High level languages can be used in this type of computers.
DISADVANTAGES OF COMPUTER:-
- The latest technology is required for manufacturing of Microprocessors.
- Limited processing power and speed.
- Memory constraints affecting program size and data processing.
- Relatively high hardware costs.
Fifth Generation
Computers (Present & Beyond)

Scientists are working hard on the 5th generation computers with quite a few breakthroughs. It is based on the technique of Artificial Intelligence (AI). Computers can understand spoken words & imitate human reasoning.
IBM Watson computer is one example that outsmarts Harvard University Students.
TYPES OF COMPUTERS
Computers can be categorized into various types based on their intended purpose and functionality. Here are some common types of computers according to purpose:-
1. Personal Computers (PCs):
- Designed for individual use, typically for general computing tasks such as web browsing, word processing, and multimedia consumption.
- Examples include desktop computers, laptops, and tablets.
2. Workstations:
- High-performance computers optimized for specialized tasks requiring significant computational power, such as graphic design, engineering, and scientific simulations.
- Workstations often feature powerful processors, large amounts of memory, and dedicated graphics processing units (GPUs).
3. Servers:
- Computers designed to provide services or resources to other computers or devices on a network.
- Servers can serve various purposes, including hosting websites, managing databases, and providing file storage and sharing capabilities.
4. Mainframes:
- Large, high-performance computers used primarily by large organizations and enterprises for critical business applications, such as transaction processing, data processing, and resource management.
- Mainframes are known for their reliability, scalability, and ability to handle massive workloads.
5. Supercomputers:
- Extremely powerful computers built to perform complex calculations and simulations at very high speeds.
- Supercomputers are used for tasks such as weather forecasting, scientific research, computational fluid dynamics, and cryptography.
6. Embedded Computers:
- Computers integrated into other devices or systems to perform specific functions.
- Embedded computers are found in a wide range of devices, including smartphones, automotive systems, home appliances, medical devices, and industrial machinery.
7. Gaming Consoles:
- Specialized computers designed primarily for playing video games.
- Gaming consoles typically feature dedicated hardware optimized for gaming performance and may include additional multimedia features.
8. Smartphones and Tablets:
- Mobile devices that combine computing capabilities with communication features, such as making calls, sending messages, and accessing the internet.
- Smartphones and tablets are used for various purposes, including productivity, entertainment, and communication.
9. Wearable Computers:
- Computers integrated into wearable devices, such as smartwatches, fitness trackers, and augmented reality glasses.
- Wearable computers often focus on providing personalized information, health monitoring, and hands-free interaction with digital content.
10.Quantum Computers:
- Cutting-edge computers that use quantum mechanics principles to perform computations using quantum bits (qubits).
- Quantum computers have the potential to solve complex problems more efficiently than classical computers, particularly in fields such as cryptography, optimization, and scientific simulations.
Computers can be generally classified by size and power as follows:-

MICROCOMPUTER
A Microcomputer is a computer that uses a microprocessor as its central processing
unit. Micro-computers are physically smaller in size as compared to mainframe
and mini-computers. Many microcomputers when equipped with a keyboard and screen
for input and output respectively can be used as personal computers (in the
generic sense).
Microcomputers are easier to use and also inexpensive as the
memory used by them i.e. microprocessors and semi conductors have become cheaper
in the last few years. E.g.: The various micro computers widely available are
IBM pcs, APPLE mac etc. the small types of pcs like the palmtop and handheld
are now becoming available.
MINICOMPUTER
It is a
midsize computer. In the past few years the difference between large minicomputers
and small mainframes has decreased significantly just like the distinction
between small minicomputers and workstations.
A minicomputer can support upto
200 users at the same time. E.g. : The various machines widely available are
vax series 8200 and 8300, Honeywell (xps-100), s series 36 level
20,50,60 galaxy-21, hcl-4, nelco-5000 and others.


MAINFRAME
Mainframe
computers known as the Big Iron; are computers that are used
primarily by corporate and governmental organizations. Modern mainframe design
is generally defined by the following features: High reliability and security Extensive
input-output facilities with the ability to offload to separate engines Strict
backward compatibility with older version of software.
SUPERCOMPUTER
Supercomputers are general-purpose computers that function at the highest operational rate or peak performance for computers. Processing power is the main difference between supercomputers and general-purpose computer systems.

Supercomputer is a term used for one of the fastest computers that exist today. They are deployed for specialized applications that require processing of highly critical data and immense amounts of mathematical calculations.
E.g. :- Weather
forecasting requires a supercomputer. PARAM is a series of supercomputers
designed and assembled by the Centre for Development of Advanced Computing
(C-DAC) in Pune, India. The latest machine in the series is the PARAM Yuva II.
China’s vast Tianhe-2 is the fastest supercomputer in the world.
PERSONAL COMPUTERS
Personal Computers are computers that are designed for an individual user. These computers are small and a relatively cheaper. In price, personal computers can range anywhere from a few hundred pounds to over five thousand pounds. Personal Computers use the microprocessor technology as they enable manufacturers to put an entire CPU onto one chip. They serve myriad purposes and can be put to use by various businesses for word processing, accounting, desktop publishing, and for running spreadsheet and database management applications. People across the globe use internet for playing games, surfing net and other online applications at their homes and personal use.
Types of Personal Computers:-
Personal computers can be classified on the basis of its size. There are two basic types of the traditional designs i.e. the desktop models and tower models. There are several variations on these two basic types also.
Tower model
This model of personal computer refers to a computer in which the power supply, motherboard, and other mass storage devices are stacked on top of each other in a cabinet.
Desktop model
Desktop model means computer that are designed to fit comfortably on top of a desk, with the monitor sitting on top of the computer. Desktop model computers as compared to the tower model are broad and low, whereas tower model computers are narrow and tall.
Notebook computer
Notebook Computer also called Ultrabook. These are extremely popular because they are extremely lightweight and portable. Because of their small size typically less than 6 pounds or lesser than that, they have become so popular. These flat-panel technologies can produce a lightweight and non-bulky display screen. The quality of notebook display screens also differs considerably. Modern notebook computers are very similar to personal computers in terms of computing power.
Laptop computer
Laptop are now a days also called notebook computers. These are small and portable. You can make them sit on your lap and work on them. Subnotebook computer Subnotebook computers are portable computers that are even lighter and smaller than a full-sized notebook computer. They are light weight because they use a small keyboard and screen as compared to a notebook computer.
Fundamentals of Computer
These computers are portable enough to be carried in one hand. They are extremely convenient for use but due to extremely small size of their keyboards and screens they have still not succeeded in to replacing notebook computers.
Palmtop
These computers as the name suggest fit in your palm. Due to extremely small size their use is limited to phone books and calendars.
PDA
PDA have electronic pens rather than keyboards for inputs unlike laptop. They also incorporate handwriting recognition features, and voice recognition technologies i.e. can also react to voice input. PDAs are also called palmtops, hand-held computers and pocket computers.
Smart phones
Smart phones are cellular phones that function both as a phone and a small pen. They may use a pen or may have a small keyboard. They can be connected to the internet wirelessly. Apple, Samsung, Sony are some manufacturers of smartphones.
MICROSOFT PAINT
Introduction:
Microsoft Paint, commonly known as Paint, is a raster graphics editor developed by Microsoft. It
has been included as a standard application in every version of the Microsoft Windows operating
system since its inception.
2. Features:
Paint provides a range of basic drawing and painting tools, including:
1. Brushes: Users can select from various brush sizes and styles to create freehand drawings or paintstrokes.
2. Pencils: Similar to brushes but with a more defined edge, suitable for drawing precise lines.
3. Shapes: Paint offers a selection of geometric shapes, such as rectangles, ellipses, polygons, and lines, which users can insert into their images.
4. Text: Users can add text to their images using different fonts, font sizes, and font colors.
5. Color Picker: Paint includes a color palette with a variety of pre-defined colors, as well as a color picker tool for selecting custom colors.
While Paint lacks the advanced features found in professional graphics software, its simplicity makes it accessible to users who need to perform basic image editing tasks quickly and efficiently.
3. User Interface:
The Paint interface is straightforward and consists of:
1. Menu Bar: Provides access to various commands and options for creating and editing images.
2. Toolbar: Contains icons representing the different drawing and editing tools available in Paint.
3. Canvas Area: The main working area where users can draw, paint, and edit their images.
| . Image Editing: Paint includes basic image editing features that allow users to manipulate their images, including: |
| 1. Crop: Users can remove unwanted portions of an image by selecting and deleting them. 2. Resize: Images can be resized to specific dimensions or scaled proportionally. 3. Rotate and Flip: Users can rotate images clockwise or counterclockwise and flip them horizontally or vertically. 4. Adjustments: Paint provides basic adjustments for brightness, contrast, and saturation. 5. Cut, Copy, and Paste: Users can cut, copy, and paste selected portions of an image within the same image or into another application. |
| 5. Selection Tools: Rectangular Selection: Allows users to select a rectangular portion of an image by dragging the mouse cursor. Free-form Selection: Enables users to select a custom-shaped portion of an image by drawing around it with the mouse cursor. Select All : Selects the entire image. Invert Selection: Inverts the current selection, deselecting the previously selected area and selecting the rest of the image. Copy, Cut, Paste: These commands allow users to copy, cut, and paste selected portions of an image within the same image or into another application. 6. Image Editing Functions: Crop: Users can remove unwanted portions of an image by selecting the desired area and cropping it to the desired size. Resize: Images can be resized to specific dimensions or scaled proportionally to reduce or enlarge them. Rotate and Flip: Users can rotate images clockwise or counterclockwise and flip them horizontally or vertically to change their orientation. Adjustments: Paint provides basic adjustments for brightness, contrast, and saturation, allowing users to enhance the appearance of their images. Eraser : The eraser tool allows users to erase parts of an image or undo previous drawing or painting actions. 7. Accessibility: One of the primary strengths of Paint is its accessibility and ease of use. It is designed to be intuitive, making it suitable for users of all skill levels, including beginners and casual users. Paint's simple interface and straightforward tools make it a popular choice for quick edits, simple drawings, and creative projects among Windows users. 8. Usage: Paint is commonly used for a variety of purposes, including: |
| 1. Creating simple graphics and illustrations 2. Editing and annotating screenshots 3. Resizing and cropping images 4. Adding text captions to images 5. Drawing diagrams and charts |
While Paint may not be suitable for more complex graphics editing tasks, it remains a versatile tool for basic image editing and drawing on Windows computers.
1. English Typing :
English typing refers to the process of inputting text in the English language using a keyboard. It is the most common method of text input on computers and electronic devices worldwide.
2. Keyboard Layouts:
There are several keyboard layouts used for English typing, with QWERTY being the most prevalent. QWERTY keyboards are named after the first six letters in the top row of keys. Other layouts, such as AZERTY and QWERTZ, are used in different regions.
3. Key Arrangement:
A standard English keyboard typically consists of alphanumeric keys, punctuation keys, function keys, navigation keys, and modifier keys. Alphanumeric keys include letters (A-Z) and numbers (0-9), arranged in a QWERTY layout.
4. Special Keys:
- Function keys (F1-F12) are located at the top row and serve various functions depending on the software being used. Navigation keys include arrow keys for moving the cursor, as well as Home, End, Page Up, and Page Down keys for navigating documents.
- Modifier keys include Shift, Ctrl (Control), Alt (Alternate), and the Windows key (on Windows keyboards). These keys modify the function of other keys when pressed in combination.
5. Typing Techniques:
- Touch Typing: Typing without looking at the keyboard, relying on muscle memory to find keys.
- This technique allows for faster and more efficient typing.
- Hunt-and-Peck Typing: Typing by visually locating each key before pressing it. While slower than touch typing, it is still a common method for many users.
6. Keyboard Layouts:
- QWERTY Layout: The most common keyboard layout, designed to prevent mechanical typewriter keys from jamming by placing commonly used letter pairs apart from each other.
- Dvorak Simplified Keyboard: An alternative keyboard layout designed for improved typing speed and efficiency by placing the most commonly used keys in the home row.
- Colemak and Workman: Other alternative layouts designed to address some of the perceived limitations of the QWERTY layout.
7. Keyboard Shortcuts:
- Keyboard shortcuts are key combinations that perform specific functions, such as Ctrl+C forcopying and Ctrl+V for pasting. These shortcuts can greatly improve productivity by reducing the need for mouse navigation.
8. Keyboard Technology:
- Key Switches: Modern keyboards use various types of key switches, including membrane, scissor,and mechanical switches. Mechanical switches are favored by many users for their tactile feedback and durability.
- Wireless Keyboards: Some keyboards connect to computers wirelessly via Bluetooth or RF (radio frequency) technology, offering greater flexibility and mobility.
9. Keyboard Accessories:
Keyboard Accessories: Some keyboards come with additional features such as backlighting, programmable keys, and wrist rests to enhance comfort and usability.
10. Keyboard Ergonomics:
Keyboard Ergonomics: Ergonomic keyboards are designed to reduce strain and discomfort during typing by promoting a more natural hand position. Features may include split designs, adjustable angles, and cushioned wrist rests.

MICROSOFT WORD
Microsoft Word is a widely used word processing software developed by Microsoft. It offers a range of tools and functions to create, edit, format, and share documents. Let's explore its various tools and functions in detail:
User Interface
- Ribbon: The Ribbon is the main toolbar at the top of the Word window, organized into tabs suchas Home, Insert, Page Layout, References, Mailings, Review, and View. Each tab contains groups of related commands and tools.
- · Document Area: The Document Area is the main working area where users can create and edit documents. It displays the content of the document in a WYSIWYG (What You See Is What You Get) format.
- · Navigation Pane: The Navigation Pane allows users to navigate through the document by displaying headings, pages, or search results.
Text Formatting Tools
- Font: Users can change the font type, size, color, and style (bold, italic, underline) of text. Paragraph: Tools for adjusting paragraph alignment (left, center, right, justify), indentation, line spacing, and bullet or numbering lists.
- Styles: Word provides predefined styles for formatting text consistently throughout the document, including headings, titles, and body text.
3. Inserting and Editing Tools:
- Insert: Allows users to insert various elements into the document, such as tables, pictures, shapes, charts, hyperlinks, headers, footers, page numbers, and symbols.
- Editing: Tools for basic text editing operations such as cut, copy, paste, find, replace, undo, and redo. Word also offers Track Changes and Comments features for collaborative editing and review.
4. Page Layout Tools:
- Page Setup: Tools for adjusting page margins, orientation (portrait or landscape), size, and paper layout.
- Themes: Allows users to apply predefined document themes that include coordinated fonts, colors, and effects.
- Page Background: Options for setting background color, watermark, and page borders.
5. Review Tools:
- Spelling & Grammar: Word includes a built-in spell checker and grammar checker to identify and correct spelling and grammatical errors in the document.
- Thesaurus: Provides synonyms and antonyms for selected words to improve writing.
- Track Changes: Allows multiple users to make edits to the document while tracking changes, comments, and revisions.
6. References Tools:
- Table of Contents: Word can automatically generate a table of contents based on headings and styles used in the document.
- Footnotes & Endnotes: Tools for adding footnotes and endnotes to provide additional information or citations.
- Citations & Bibliography: Allows users to insert citations and create a bibliography using various citation styles.
7. Mailings Tools:
Mail Merge: Word's Mail Merge feature enables users to create personalized documents (such as letters or envelopes) by merging data from a spreadsheet or database with a template document.
8. View Tools:
- Document Views: Allows users to switch between different document views, including Print Layout, Full Screen Reading, Web Layout, Outline, and Draft views.
- Zoom: Tools for adjusting the document zoom level to view the content at different magnifications.
9. Accessibility and Collaboration Tools:
- Accessibility Checker: Word includes an Accessibility Checker to help users identify and fix accessibility issues in their documents, ensuring they are usable by people with disabilities.
- Sharing and Collaboration: Word integrates with Microsoft OneDrive and SharePoint for cloudbased storage and real-time collaboration on documents.
10. Save and Export Tools:
- Save: Allows users to save documents in various formats, including the default .docx format, as well as older Word formats (.doc), PDF, and other file types.
- Export: Tools for exporting documents to different file formats, such as PDF, HTML, plain text, and rich text format (RTF).
MICROSOFT WORD – HOME
1. Clipboard:
- Cut: Removes the selected content and places it on the clipboard for pasting elsewhere.
- Copy: Copies the selected content to the clipboard without removing it from the document.
- Paste: Inserts the content from the clipboard at the cursor location.
- Format Painter: Copies the formatting from a selected text and applies it to another text.
2. Font:
- Font: Allows users to change the font type.
- Font Size: Adjusts the size of the selected font.
- Bold: Applies bold formatting to the selected text.
- Italic: Applies italic formatting to the selected text.
- Underline: Adds an underline to the selected text.
- Strikethrough: Places a line through the selected text.
- Subscript: Lowers the selected text below the baseline.
- Superscript: Raises the selected text above the baseline.
- Text Highlight Color: Highlights the selected text with a colored background.
- Font Color: Changes the color of the selected text.
3. Paragraph:
- Align Left: Aligns the selected text to the left margin.
- Center: Centers the selected text between the left and right margins.
- Align Right: Aligns the selected text to the right margin.
- Justify: Aligns the selected text to both the left and right margins, adding spacing between words as needed.
- Line Spacing: Adjusts the vertical spacing between lines of text.
- Increase Indent: Increases the indent of the selected paragraph.
- Decrease Indent: Decreases the indent of the selected paragraph.
- Bullets: Adds bullet points to the selected paragraphs.
- Numbering: Adds numbering to the selected paragraphs.
- Multilevel List: Creates a multilevel list with different levels of indentation.
- Sort: Sorts the selected paragraphs alphabetically or numerically.
4. Styles:
- Styles Gallery: Provides quick access to predefined styles for headings, titles, and other text elements.
- Change Styles: Allows users to modify the formatting of selected text or apply a different style set to the entire document.
- Apply Styles: Applies a specific style to the selected text.
5. Editing:
- Find: Opens the Find and Replace dialog box for searching for specific text within the document.
- Replace: Opens the Find and Replace dialog box, allowing users to find and replace text with other text.
- Select: Offers options to select specific elements in the document, such as Select All, Select Objects, and Select Text with Similar Formatting.
- Go To: Navigates to a specific page, section, line, or bookmark within the document.
- Clear Formatting: Removes all formatting from the selected text, reverting it to the default style.
6. Proofing:
- Spelling & Grammar: Runs a spell check and grammar check on the document, highlighting errors and providing suggestions for corrections.
- Word Count: Displays the number of words, characters, paragraphs, and lines in the document.
- Translate: Allows users to translate selected text or the entire document into a different language using Microsoft Translator.
- Language: Changes the proofing language for the document.
7. View:
- Print Layout: Switches to Print Layout view, which displays the document as it will appear when printed.
- Read Mode: Switches to Read Mode, optimizing the document for reading on-screen with features such as column layout and navigation controls.
- Web Layout: Switches to Web Layout view, which displays the document as it will appear in a web browser.
- Outline: Switches to Outline view, which displays the document's structure in an outline format.
- Draft: Switches to Draft view, showing the document without page breaks or formatting, allowing for quick editing.
MICROSOFT WORD – INSERT
- Pages: Cover Page: Inserts a predesigned cover page at the beginning of the document.
- Blank Page: Inserts a blank page at the cursor location in the document.
- Page Break: Inserts a page break, forcing subsequent content to start on a new page.
- Page Number: Allows users to insert page numbers at the top or bottom of the page, or aligned to the left, center, or right margins.
- WordArt: Inserts stylized text with various artistic effects.
- Tables: Table: Inserts a table with a specified number of rows and columns.
- Excel Spreadsheet: Embeds an Excel spreadsheet into the Word document for data manipulation and analysis.
- Illustrations: Pictures: Inserts images from files stored on the computer or from online sources.
- Online Pictures: Allows users to search for and insert images from online sources such as Bing Images or OneDrive.
- Shapes: Inserts various shapes, such as rectangles, circles, arrows, and flowchart symbols.
- Icons: Inserts icons from a library of predefined icons.
- 3D Models: Inserts 3D models into the document for visualization purposes.
- SmartArt: Inserts SmartArt graphics for illustrating concepts and processes.
- Chart: Inserts a chart based on data entered into an Excel spreadsheet or from an existing data source.
- Links: Hyperlink: Inserts a hyperlink to a webpage, email address, file, or location within the document.
- Bookmark: Inserts a bookmark at a specific location within the document for easy navigation or reference.
- Text: Text Box: Inserts a text box, allowing users to add text that can be positioned anywhere in the document.
- Quick Parts: Inserts predefined building blocks of content, such as headers, footers, cover pages, and boilerplate text.
- WordArt: Inserts stylized text with various artistic effects.
- Symbols: Equation: Inserts mathematical equations and symbols using the Equation Editor.
- Symbol: Inserts symbols and special characters, such as currency symbols, mathematical symbols, and accented letters.
- Media: Audio: Inserts audio files into the document for playback.
- Video: Inserts video files into the document for playback.
- Comments: Comment: Inserts a comment at the cursor location for adding notes or feedback to the document.
- Header & Footer: Header: Inserts a header at the top of each page in the document.
- Footer: Inserts a footer at the bottom of each page in the document.
- Page Number: Allows users to insert page numbers within headers or footers.
- Text: Object: Inserts an object from various sources, such as files, programs, or websites.
- MICROSOFT WORD – DESIGN & PAGE LAYOUT
Document Formatting: Document Formatting: Offers a range of predefined document formatting themes that include coordinated fonts, colors, and effects. Users can choose from a selection of built-in themes or customize their own.
Online Pictures: Allows users to search for and insert images from online sources such as Bing Images or OneDrive.
Shapes: Inserts various shapes, such as rectangles, circles, arrows, and flowchart symbols.
Icons: Inserts icons from a library of predefined icons.
3D Models: Inserts 3D models into the document for visualization purposes.
SmartArt: Inserts SmartArt graphics for illustrating concepts and processes.
Chart: Inserts a chart based on data entered into an Excel spreadsheet or from an existing data source.
Links: Hyperlink: Inserts a hyperlink to a webpage, email address, file, or location within the document.
Bookmark: Inserts a bookmark at a specific location within the document for easy navigation or reference.
Text: Text Box: Inserts a text box, allowing users to add text that can be positioned anywhere in the document.
Quick Parts: Inserts predefined building blocks of content, such as headers, footers, cover pages, and boilerplate text.
WordArt: Inserts stylized text with various artistic effects.
Symbols: Equation: Inserts mathematical equations and symbols using the Equation Editor.
Symbol: Inserts symbols and special characters, such as currency symbols, mathematical symbols, and accented letters.
Media: Audio: Inserts audio files into the document for playback.
Video: Inserts video files into the document for playback.
Comments: Comment: Inserts a comment at the cursor location for adding notes or feedback to the document.
Header & Footer: Header: Inserts a header at the top of each page in the document.
Footer: Inserts a footer at the bottom of each page in the document.
Page Number: Allows users to insert page numbers within headers or footers.
Text: Object: Inserts an object from various sources, such as files, programs, or websites.
MICROSOFT WORD – DESIGN & PAGE LAYOUT
Document Formatting: Document Formatting: Offers a range of predefined document formatting themes that include coordinated fonts, colors, and effects. Users can choose from a selection of built-in themes or customize their own.
Page Background: Page Color: Allows users to change the background color of the entire page.
Watermark: Inserts a watermark, such as "Confidential" or "Draft," into the background of thepage.
Page Borders: Adds decorative borders around the edges of the page or selected paragraphs.
Page Layout:Columns: Divides the page into multiple columns for organizing text or creating newsletter-style layouts.
Margins: Adjusts the margins of the page to control the amount of white space around the edges.
Orientation: Changes the page orientation between portrait (vertical) and landscape (horizontal).
Size: Changes the paper size of the document, such as Letter, Legal, A4, or Custom size.
Paragraph Spacing: Spacing: Adjusts the spacing between paragraphs for better readability. Options include single spacing, 1.5 spacing, double spacing, and custom spacing.
Paragraph Indentation:
Indentation: Sets the indentation for the first line or entire paragraph. Users can choose options
such as none, left, right, or hanging indentation.
- Arrange: Position: Allows users to position objects, such as images or shapes, relative to the text or page margins. Options include in line with text, behind text, in front of text, and more.
Wrap Text: Controls how text flows around an object. Options include square, tight, through, top and bottom, and behind text.
Bring Forward/Send Backward: Changes the stacking order of objects on the page, bringing selected objects forward or sending them backward.
Table Styles: Table Styles: Applies predefined formatting styles to tables, including various colors, borders, and shading effects.
Borders: Customizes the borders of selected cells, rows, or columns in a table.
Borders and Shading: Borders: Allows users to add borders to selected text, paragraphs, or page elements. Options include line style, color, and thickness.
Shading: Applies background shading to selected text or paragraphs, allowing users to highlight important information.
Page Borders: Page Borders: Adds decorative borders around the edges of the page or selected paragraphs, allowing users to customize the border style, color, and width.
Themes: Customize Themes: Users can customize existing themes by adjusting font styles, colors, and effects to create a personalized look for their documents.
Save Custom Themes: After customizing a theme, users can save it for future use to maintain consistency across multiple documents.
Page Borders
· Page Borders: Adds decorative borders around the edges of the page or selected paragraphs, allowing users to customize the border style, color, and width.
Themes
- Customize Themes: Users can customize existing themes by adjusting font styles, colors, and effects to create a personalized look for their documents.
- · Save Custom Themes: After customizing a theme, users can save it for future use to maintainconsistency across multiple documents.
Page Color
Gradient Fill: Allows users to apply gradient colors to the background of the page, creating visually appealing effects.
· Texture Fill: Adds texture to the background of the page, providing a tactile appearance.
· Picture Fill: Inserts an image as the background of the page, with options to adjust transparency and tiling.
Watermark
Custom Watermarks: Users can create custom watermarks with text or images, such as logos or company names, to add branding or security to their documents.
· Watermark Positioning: Options to position the watermark diagonally, horizontally, or vertically across the page.
Columns
Column Width and Spacing: Users can adjust the width and spacing of columns to create custom layouts tailored to their document's content.
· Line Between Columns: Inserts a vertical line between columns for visual separation and clarity.
Page Setup
Orientation Presets: Offers preset options for page orientation, including portrait, landscape, and mirrored layouts.
· Page Size Customization: Allows users to define custom page sizes for specialized printing requirements or unique document formats.
Breaks:
Page Break: Inserts a page break, forcing subsequent content to start on a new page.
· Section Breaks: Divides the document into sections with different page layouts or formatting options, such as headers, footers, and page numbering.
Line Numbers:
Line Numbers: Adds line numbers to the document for reference or citation purposes, aiding in navigation and collaboration.
Hyphenation
Hyphenation: Enables or disables automatic hyphenation of words at the end of lines to improvem text flow and appearance.
MICROSOFT WORD – REFERENCES
The References tab in Microsoft Word provides various tools and functions for managing citations,references, and document structure. Let's explore each of these tools and functions in detail:
Table of Contents
Table of Contents: Automatically generates a table of contents based on the headings and styles used in the document. Users can customize the appearance and formatting of the table of contents.
Footnotes:
Insert Footnote: Adds a footnote at the current cursor position, allowing users to provide additional information, citations, or references within the document.
Show Footnote/Endnote: Displays footnotes or endnotes within the document, allowing users to view and edit them as needed.
3. Citations & Bibliography:
Manage Sources: Opens the Manage Sources dialog box, where users can add, edit, or delete sources for citations and bibliography.
Insert Citation: Inserts a citation from the source manager into the document, using the specified citation style (e.g., APA, MLA, Chicago).
Insert Bibliography: Inserts a bibliography at the current cursor position, listing all the sources cited in the document according to the specified citation style.
Style: Allows users to choose from a variety of citation styles for formatting citations and bibliographies.
Citation Options: Provides options for customizing citation formatting, such as adding page numbers or excluding author names.
4. Captions:
Insert Caption: Adds a caption to selected objects, such as figures or tables, providing a label and numbering for easy reference.
Cross-reference: Inserts a cross-reference to a captioned object elsewhere in the document, allowing users to refer readers to specific figures, tables, or sections.
Update Captions: Updates the numbering and formatting of captions and cross-references in the document.
5. Index:
Mark Entry: Allows users to mark specific text in the document for inclusion in the index.
Insert Index: Inserts an index at the current cursor position, listing all the marked entries with page numbers.
Update Index: Updates the index to reflect any changes in the marked entries or page numbers.
6. Table of Authorities:
Mark Citation: Allows users to mark citations in the document for inclusion in the table of authorities.
Insert Table of Authorities: Inserts a table of authorities at the current cursor position, listing all the marked citations with page numbers.
Update Table: Updates the table of authorities to reflect any changes in the marked citations or page numbers.
7. Mailings:
Mail Merge: Opens the Mail Merge wizard, allowing users to create personalized documents by merging data from a spreadsheet or database with a template document.
8. Review:
Track Changes: Enables or disables track changes mode, allowing users to track and review changes made to the document by different authors.
Accept/Reject Changes: Allows users to accept or reject individual changes tracked in the document, either one at a time or all at once.
These tools and functions in the References tab provide users with powerful capabilities for managing citations, references, tables of contents, indexes, and more, ensuring accuracy, consistency, and professionalism in their documents. They are essential for academic writing, research papers, legal documents, and other types of structured documents requiring proper citation and referencing.
MICROSOFT WORD – MAILINGS
The Mailings tab in Microsoft Word provides various tools and functions for creating and managing mail merge documents, envelopes, labels, and other mailing-related tasks. Let's explore each of these tools and functions in detail:
1. Start Mail Merge:
Start Mail Merge: Initiates the mail merge process, allowing users to create personalized documents by merging data from a spreadsheet or database with a template document.
2. Write & Insert Fields:
Insert Merge Field: Inserts placeholders for merge fields into the document, such as names, addresses, or other data fields from the data source.
Address Block: Inserts a standardized address block into the document, combining multiple address fields (e.g., name, street address, city, state, zip code) into a single block.
Greeting Line: Inserts a personalized greeting line into the document, addressing recipients by name based on the data source.
3. Select Recipients:
Select Recipients: Allows users to choose the data source for the mail merge, such as an Excel spreadsheet, Access database, Outlook contacts, or an existing list.
Edit Recipient List: Opens the Mail Merge Recipients dialog box, where users can filter, sort, or edit the list of recipients before performing the mail merge.
4. Insert Merge Field:
Insert Merge Field: Inserts placeholders for merge fields into the document, allowing users to customize the content for each recipient based on data from the data source.
5. Preview Results:
Preview Results: Displays a preview of the merged document, showing how the content will appear for each recipient based on the data source.
Highlight Merge Fields: Highlights merge fields in the document for easy identification during the preview process.
6. Finish:
Finish & Merge: Completes the mail merge process and generates individual documents for each recipient, either printing them directly, saving them as separate files, or sending them as email messages.
7. Envelopes:
Envelopes: Opens the Envelopes and Labels dialog box, where users can create and print envelopes for mailing.
Return Address: Allows users to specify a return address to be printed on the envelopes. Delivery Address: Provides options for entering recipient addresses directly or selecting addresses from Outlook contacts.
8. Labels:
Labels: Opens the Envelopes and Labels dialog box, where users can create and print mailing labels for envelopes or packages.
Label Options: Allows users to customize label size, layout, and formatting options.
9. Start Mail Merge:
Step by Step Mail Merge Wizard: Guides users through the mail merge process step by step, providing prompts and options for each stage of the process.
10. Mail Merge:
Mail Merge Recipients: Allows users to view, filter, and sort the list of recipients before
performing the mail merge.
Mail Merge Fields: Provides a list of available merge fields from the data source, allowing users to insert them into the document for customization.
These tools and functions in the Mailings tab provide users with comprehensive capabilities for creating personalized documents, envelopes, and labels, streamlining the process of bulk mailing and communication. They are essential for businesses, organizations, and individuals who need to send customized communications to a large number of recipients efficiently.
MICROSOFT WORD – REVIEW
The Review tab in Microsoft Word provides various tools and functions for proofreading, editing, and collaborating on documents. Let's explore each of these tools and functions in detail:
1. Proofing:
Spelling & Grammar: Runs a spell check and grammar check on the document, highlighting errors and providing suggestions for corrections.
Thesaurus: Provides synonyms and antonyms for selected words to improve writing.
Word Count: Displays the number of words, characters, paragraphs, and lines in the document.
Translate: Allows users to translate selected text or the entire document into a different language using Microsoft Translator.
Language: Changes the proofing language for the document.
2. Comments:
New Comment: Inserts a comment at the current cursor position or selected text, allowing users to provide feedback, notes, or suggestions.
Delete: Removes selected comments from the document.
Previous/Next: Navigates between comments in the document for easy review and editing.
Show Comments: Displays all comments in the document for review and collaboration.
3. Tracking:
Track Changes: Enables or disables track changes mode, allowing users to track and review changes made to the document by different authors.
Accept/Reject Changes: Allows users to accept or reject individual changes tracked in the document, either one at a time or all at once.
Display for Review: Offers options for how tracked changes are displayed in the document, such as All Markup, Simple Markup, No Markup, and Original.
4. Compare:
Compare: Compares two versions of the document and displays the differences side by side, allowing users to review and merge changes.
Combine: Merges multiple versions of the document into a single document, combining tracked changes and comments from each version.
5. Protect:
Protect Document: Restricts editing and formatting options for the document, allowing users to specify permissions for different users or groups.
Restrict Editing: Limits editing permissions for the document, such as allowing only tracked changes or comments.
6. Accessibility:
Check Accessibility: Runs an accessibility check on the document, identifying potential issues that may affect readability or usability for people with disabilities.
Accessibility Checker: Provides detailed information about accessibility issues found in the document and suggestions for improving accessibility.
7. Document Inspector:
Inspect Document: Scans the document for hidden metadata, personal information, or other sensitive content that may need to be removed before sharing or publishing.
Remove All: Removes specified types of hidden content, such as comments, annotations, or document properties, from the document.
8. Protect:
Protect Document: Restricts editing and formatting options for the document, allowing users to specify permissions for different users or groups.
Restrict Editing: Limits editing permissions for the document, such as allowing only tracked changes or comments.
MICROSOFT WORD – VIEW
The View tab in Microsoft Word provides various tools and functions for controlling the layout, appearance, and navigation of your document. Let's explore each of these tools and functions in detail:
1. Document Views:
Read Mode: Switches to Read Mode, optimizing the document for reading on-screen with features such as column layout, navigation controls, and full-screen view.
Print Layout: Switches to Print Layout view, displaying the document as it will appear when printed, with page breaks, margins, and headers/footers.
Web Layout: Switches to Web Layout view, displaying the document as it will appear in a web browser, with flowing text and images.
Outline: Switches to Outline view, displaying the document's structure in an outline format, allowing users to view and navigate headings and subheadings.
Draft: Switches to Draft view, showing the document without page breaks or formatting, allowing for quick editing and content creation.
2. Show/Hide:
Ruler: Toggles the display of the horizontal and vertical rulers, allowing users to adjust margins, indentation, and tab stops.
Gridlines: Toggles the display of gridlines on the page, providing a visual reference for aligning objects and text.
Navigation Pane: Toggles the display of the Navigation Pane, which allows users to navigate through the document by displaying headings, pages, or search results.
Thumbnails: Toggles the display of thumbnail images of each page in the document, providing a visual overview for navigation.
3. Zoom:
Zoom In/Zoom Out: Adjusts the zoom level of the document, allowing users to increase or decrease the size of the text and images.
Zoom Slider: Provides a slider for adjusting the zoom level of the document interactively.
Zoom Percentage: Allows users to specify the exact zoom percentage for the document.
4. Window:
New Window: Opens a new window for the current document, allowing users to view different parts of the document side by side.
Arrange All: Arranges all open document windows on the screen, making it easier to compare and work with multiple documents simultaneously.
Split: Splits the document window into two panes, allowing users to view different parts of the document at the same time.
Switch Windows: Allows users to switch between open document windows.
5. Macros:
Macros: Opens the Macros dialog box, where users can record, create, edit, and run macros to automate repetitive tasks in Word.
6. Show/Hide:
Field Codes: Toggles the display of field codes in the document, allowing users to view and edit the underlying code for fields such as page numbers, dates, and cross-references.
All Markup: Displays all markup, including comments, tracked changes, and formatting changes, in the document.
Simple Markup: Displays only a simplified view of markup, hiding detailed changes and
comments.
No Markup: Hides all markup, displaying the document without tracked changes or comments.
MICROSOFT WORD – DEVELOPER
The Developer tab in Microsoft Word provides advanced tools and functions for creating,
editing, and managing macros, forms, and other developer-related tasks. Let's explore
each of these tools and functions in detail:
1. Code:
Macros: Opens the Macros dialog box, where users can record, create, edit, and run
macros to automate repetitive tasks in Word.
Visual Basic: Opens the Visual Basic for Applications (VBA) editor, allowing users to
write, debug, and manage VBA code for advanced customization and automation.
2. Add-Ins:
Add-Ins: Opens the Add-Ins dialog box, where users can manage installed add-ins for
extending the functionality of Word, such as third-party tools or custom solutions.
3. Controls:
Legacy Forms: Inserts legacy form fields into the document, allowing users to create
forms with text fields, checkboxes, dropdown lists, and other interactive elements.
Check Box Content Control: Inserts a checkbox content control into the document,
allowing users to create interactive checkboxes for forms and surveys.
Combo Box Content Control: Inserts a combo box content control into the document,
allowing users to create dropdown lists with selectable options.
Drop-Down List Content Control: Inserts a dropdown list content control into the
document, allowing users to create dropdown menus with selectable options.
Date Picker Content Control: Inserts a date picker content control into the document,
allowing users to select dates from a calendar interface.
4. XML Mapping:
XML Mapping Pane: Opens the XML Mapping pane, allowing users to map XML data
to content controls in the document for advanced data manipulation and integration.
5. Legacy Forms:
Text Form Field: Inserts a text form field into the document, allowing users to enter
text or data into a designated area.
Check Box Form Field: Inserts a checkbox form field into the document, allowing users
to create interactive checkboxes for forms and surveys.
Drop-Down Form Field: Inserts a dropdown form field into the document, allowing
users to create dropdown menus with selectable options.
Date Picker Form Field: Inserts a date picker form field into the document, allowing
users to select dates from a calendar interface.
6. Show/Hide:
Gridlines: Toggles the display of gridlines on the page, providing a visual reference for
aligning objects and text.
Design Mode: Toggles design mode, allowing users to design and edit form controls
within the document.
Document Protection: Opens the Restrict Editing pane, allowing users to restrict
editing permissions for specific parts of the document, such as form fields or sections.
7. Developer:
Document Template: Opens the Templates and Add-Ins dialog box, allowing users to
manage document templates and add-ins for customizing Word documents.
These tools and functions in the Developer tab provide users with advanced capabilities
for creating and customizing forms, managing macros, integrating data, and extending
the functionality of Microsoft Word. They are essential for developers, power users,
and businesses that require advanced customization and automation features in Word
documents.
MICROSOFT EXCEL
MS Excel is a commonly used Microsoft Office application. It is a spreadsheet program which is used to save and analyse numerical data.
In this article, we bring to you the important features of MS Excel, along with an overview of how to use the program, its benefits and other important elements. A few sample MS Excel question and answers are also given further below in this article for the reference of Government exam aspirants.
Basics of MS Excel
What is MS Excel?
MS Excel is a spreadsheet program where one can record data in the form of tables. It is easy to analyse data in an Excel spreadsheet.
How to open MS Excel?
To open MS Excel on your computer, follow the steps given below:
- Click on Start
- Then All Programs
- Next step is to click on MS Office
- Then finally, choose the MS-Excel
option Alternatively, you can also click on the Start button and type MS Excel in the search option available.
What is a cell?
A spreadsheet is in the form of a table comprising rows and columns. The rectangular box at the intersection point between rows and columns forms a cell.
What is Cell Address?
The cell address is the name by which is cell can be addressed. For example, if row 7 is interested in column G, then the cell address is G7.
Features of MS Excel
Various editing and formatting can be done on an Excel spreadsheet. Discussed below are the various features of MS Excel.
Home
Comprises options like font size, font styles, font colour, background colour, alignment, formatting options and styles, insertion and deletion of cells and editing options
Insert
Comprises options like table format and style, inserting images and figures, adding graphs, charts and sparklines, header and footer option, equation and symbols
Page Layout
Themes, orientation and page setup options are available under the page layout option
Formulas
Since tables with a large amount of data can be created in MS excel, under this feature, you can add formulas to your table and get quicker solutions
Data
Adding external data (from the web), filtering options and data tools are available under this category
Review
Proofreading can be done for an excel sheet (like spell check) in the review category and a reader can add comments in this part
View
Different views in which we want the spreadsheet to be displayed can be edited here. Options to zoom in and out and pane arrangement are available under this category
Benefits of Using MS Excel
MS Excel is widely used for various purposes because the data is easy to save, and information can be added and removed without any discomfort and less hard work.
Given below are a few important benefits of using MS Excel:
Easy To Store Data: Since there is no limit to the amount of information that can be saved in a spreadsheet, MS Excel is widely used to save data or to analyse data. Filtering information in Excel is easy and convenient.
Easy To Recover Data: If the information is written on a piece of paper, finding it may take longer, however, this is not the case with excel spreadsheets. Finding and recovering data is easy.
Application of Mathematical Formulas: Doing calculations has become easier and less time-taking with the formulas option in MS excel
More Secure: These spreadsheets can be password secured in a laptop or personal computer and the probability of losing them is way lesser in comparison to data written in registers or piece of paper.
Data at One Place: Earlier, data was to be kept in different files and registers when the paperwork was done. Now, this has become convenient as more than one worksheet can be added in a single MS Excel file.
Neater and Clearer Visibility of Information: When the data is saved in the form of a table, analysing it becomes easier. Thus, information is a spreadsheet that is more readable and understandable.
MS Excel – Points To Remember
There are certain things which one must know with respect to MS Excel, its applications and usage:
An MS Excel file is saved with an extension of .xls
Companies with large staff and workers use MS Excel as saving employee information becomes easier
Excel spreadsheets are also used in hospitals where the information of patients can be saved more easily and can be removed conveniently once their medical history is cleared
The sheet on which you work is called a Worksheet
Multiple worksheets can be added in a single Excel file
This is a data processing application
What are the main functions of Excel?
MS Excel has a wide range of functions with which it is possible to interact with the data in the rows and columns of the program's sheets. These are the main Excel analysis functions:
Basic formulas- They allow you to perform basic arithmetic calculations. (+, -, *, /)
Mathematical functions- Excel provides both basic and complex trigonometric functions (SUM, AVERAGE, MAX, MIN, SIN, COS, and TAN)
Conditional functions- Thanks to them, it is possible to perform evaluations based on conditions (IF, AND, OR, NOT)
Lookup functions- They allow you to find values in the table (VLOOKUP, HLOOKUP, INDEX, MATCH)
Text functions- They provide the ability to interact, manipulate, and format text strings (CONCATENATE, LEFT, RIGHT, UPPER)
Statistical functions- Perform statistical analysis (AVERAGE, MEDIAN, CORREL, STDEV)
Date and time functions- They allow you to perform calculations based on time (TODAY, NOW, DAY, MONTH, YEAR)
Financial functions- They are useful for performing calculations based on finance (RATE, FV, PV, PMT).

Excel Formulas Cheat Sheet
Basic Formula
|
Formula |
Structure |
Explanation |
|
AVERAGE |
=AVERAGE(A2:A10) |
Returns a mathematical average of a given cell range |
|
COUNT |
=COUNT(A2:A10) |
Returns the count of the numbers in given cell range |
|
MAX
|
=MAX(A2:A10)
|
Finds the largest value in a given cell range |
|
MEDIAN
|
=MEDIAN(A2:A10)
|
Returns the median value, or middle value, in a given cell range |
|
MIN
|
=MIN(A2:A10) |
Finds the smallest value in a given cell range |
|
SUM
|
=SUM(A2:A10)
|
Totals numbers in a given cell range |
Cell range A2:A10 is used above to indicate that each formula uses a cell range as it
arguments.
Time Formulas
|
Formula |
Structure |
Explanation |
|
TODAY |
=TODAY() |
Volatile – takes no arguments – returns today’s date |
|
NOW |
=NOW() |
Volatile – takes no arguments – returns today’s date |
|
DATEDIF |
=DATEDIF(Start Date, End Date, Unit) |
Returns the number of years, months or days
between two dates Start Date – date furthest in the past Unit could be “Y” for years, “M” for months or “D” for days Units must be in double quotes This formula is NOT in the function library |
|
YEAR |
=YEAR(Date) |
Returns the year portion of date Example =YEAR(7/16/2005) would return 2005 |
|
MONTH
|
=MONTH(Date) |
Returns the month portion of date Example=MONTH(7/16/2005) would return 7
|
|
DAY
|
=DAY(Date)
|
Returns the day portion of date Example =DAY(7/16/2005) would return 16 |
Use a time formula and get an answer you didn’t expect? If you got a date and were
expecting a number, remember to change the formatting from date to number. If you got a number and were expecting a date, change the formatting to date.
Logical Formulas
|
Formula |
Structure |
Explanation |
|
IF
|
=IF(Logical Test, TRUE, FALSE) |
Evaluates the statement in the logical test to determine if it is TRUE or FALSE A Logical test compares the value of one cell to another, or a cell value to a constant value, using a comparison operator such as: o Equal = o Less than < o Greater than > o Less than or equal to <= o Greater than or equal to >= o Not equal to <> TRUE – this part of the IF function will only execute when the logical test is TRUE FALSE – this part of the IF function will only execute when the logical test is FALSE Both TRUE and FALSE can be a word, a formula or a constant value To return a blank cell use two double quotes |
|
OR
|
=OR(Logical Test 1, Logical Test 2, ...) |
This formula can only return TRUE or FALSE Only one test in the group must return TRUE for the formula to return TRUE
|
|
AND
|
=AND(Logical Test 1, Logical Test 2, ...) |
This formula can only return TRUE or FALSE Only one test in the group must return FALSE for the formula to return FALSE |
Lookup Formulas
|
Formula |
Structure |
Explanation
|
|
VLOOKUP
|
=VLOOKUP (Lookup Value, Table Array, Col Index, Range Lookup)
|
Lookup Value - What the function is looking for in the table array Table Array - The table defined as a cell range Col Index - The column in the table that forms the return Range lookup - False for exact match, True or blank for near Match Notes: o A vlookup can only search vertically through the left most column of a table array for near or exact matches o In most cases you will want to use absolute cell referencing when indicating a table array o If you omit the Range Lookup, Excel will assume “True” and look for a near match |
Financial Formulas
|
Formula
|
Structure |
Explanation |
|
PMT
|
= PMT(rate, nper, pv, [fv],
|
[type]) rate – Annual Percentage Rate o Divide yearly rate by 12 months o REQUIRED nper – number of periods o How many months are in the loan? (12 months/year) * length of loan in years = length of loan in months o REQUIRED pv – present value o amount of loan – this is the amount that was borrowed o REQUIRED [fv] and [type] are in square brackets because they're optional arguments. o fv – future value - $0 if the loan is paid if full Excel assumes zero if omitted o type – 0 (zero) means the payments are due at the end of each period, 1 means they're due at the beginning Excel assumes your payments are due at the end of the period if omitted |
|
Formula
|
Structure |
Explanation |
|
SUMIF |
= SUMIF(range, criteria, [sum_range])
|
SUMIF will return at total based on one criteria Range - Required. The range of cells that you want evaluated by criteria. Criteria - Required. The criteria in the form of a number, expression, a cell reference, text, or a function that defines which cells will be added. For example, criteria can be expressed as 32, ">32", B5, "32", "apples", or TODAY(). Important: Any text criteria or any criteria that includes logical or mathematical symbols must be enclosed in double quotation marks ("). If the criteria is numeric, double quotation marks are not required. Sum_Range Optional. o The actual cells to add, if you want to add cells other than those specified in the range argument. o If the sum_range argument is omitted, Excel adds the cells that are specified in the range argument (the same cells to which the criteria is applied). |
|
SUMIFS
|
SUMIFS =SUMIFS(sum_ range, criteria_range1, criteria1, [criteria_range2 , criteria2], ...)
|
SUMIFS will return at total based on more than one criteria Sum_Range - The range of cells to sum Criteria_range1 – Required o The range that is tested using Criteria1 Criteria1 – Required o The first value tested for – this must be a match to be included in the total Criteria_range2 – Optional o The range that is tested using Criteria2 Criteria2 – Optional o The second value tested for – this must be a match to be included in the total And so on... |
|
COUNTIF
|
=COUNTIF(range, criteria) |
Answers the question “How many of something (criteria) exist within specific set of cells (range)? =COUNTIF(Where do you want to look?, What do you want to look for?) Range – Required – Sets cells to be included in the count Criteria – Required – Tells formula what to look for |
|
COUNTIFS
|
=COUNTIFS(crit eria_range1, criteria1, [criteria_range2 , criteria2]...)
|
criteria_range1 – Required. o The first range in which to evaluate the associated criteria. criteria1 – Required. o The criteria in the form of a number, expression, cell reference, or text that define which cells will be counted. For example, criteria can be expressed as: 32, ">32", B4, "apples", or "32" criteria_range2, criteria2, ... o Optional. o Additional ranges and their associated criteria. Up to 127 range/criteria pairs are allowed. Important: o Each additional range must have the same number of rows and columns as the criteria_range1 argument. o The ranges do not have to be adjacent to each other |